

QT's DMT Extraction for Students
v1.1.3
Originally archived at http://digilander.libero.it/irimias/dmt_guide.html (defunct)
Citation: Last J. "Article Title". Publication. Jun 15 2003;2:19.Online edition: Erowid.org/plants/nutmeg/nutmeg_article#.shtml
Translations : French / Francais
"It lasted for a million
years and for a split-second. But it's over and now it's your turn."
-Timothy Leary

Controlled substance
(hallucinogen) U.S. Code of Federal Regulations, Title 21 Part 1308.11
(1985).
In modern times there has been a reduction of ritual. The ceremonies, that previously served to cast out an individual from modern associations and throw him into a field of epiphanies, have become merely form, betraying the inner forces that must somehow manifest. Shamen know of these inner forces. They understand the inevitable overwhelming psychological experience that everyone will face if they are to complete their inward path to open the unconscious and fall in. The psychological crisis is the fulcrum of any metaphysical realization the individual may have about himself or his world. Without these intense experiences, without the rituals that convey the message of the journey, and without shamen to show the way, many are lost in the world searching constantly farther for what is contained only within. To chemically force such spiritual breakthrough may be interpreted by some as a way to circumvent the trials that are necessary to test each soul willing to see the truth of their life. But in contemporary society where is the individual to seek these tests of the self or to be struck silent in awe of their own natural beauty or that of the universe? The shamen offered these opportunities to the individuals of their society for generations, helping people maintain a healthy psychology between the known world and the mystical. I now offer this ability to you in one of many forms, DMT.
DMT is perhaps the most powerful hallucinogen known to man. It is related to LSD and psilocybin. There are no [commonly used - Erowid] drug tests that would show DMT usage. None of the basic NIDA-5 drug tests [Erowid Note: Now called the "SAMHSA-5"] or any extended drug test will show a result for DMT. DMT is naturally formed in the body and has been found in abnormal levels in the body fluids of persons suffering from schizophrenia. DMT is almost never sold through dealers, rarely synthesized, and seldom used. It is, however, easily extracted from common plant materials and has been used in various forms for hundreds of years (timeline). DMT is not a "social drug" however. Respect the drug and its incredible potential. This drug is not for the inexperienced, nor is it recommended to those who are just looking for another "high." Few seek the visions enabled through DMT, and even fewer return to them. Even avid psychedelic users have had frightening experiences with DMT on their first encounter with the drug. Take care to research and find out if DMT is for you. I stress that educating yourself about this drug (and about all drugs you intend to use) will make you a more competent and prepared chemist, tripper, and guide.
This manual is presented as a quick bench guide for the complete novice on how to extract DMT. Although the text and illustrations for the process were all created by myself, there are a few pictures which are not my own. The origins of these pictures are credited in the bibliography. I would like to encourage others to add to this manual their own written observations. When attempting to produce any of these products the reader is encouraged to read through the steps several times to closely familiarize himself with the entire process. Please take note that DMT is an illegal substance in the United States of America and is controlled under federal regulations. The following is for educational purposes only.
How to Extract DMT from Natural Sources
(in Ten Easy Steps)
First a plant must be selected that contains the chemicals we wish to extract. None of these plants are illegal and they can be found growing wild and free all over the world (much less can be said for some of our other favorite plants.) Most of these plant materials can be ordered through the internet. A little research may reveal a large quantity of some useful plant material growing near you. Alkaloid contents of each plant mary vary according to the growing conditions. Specifics about these plants and how to grow them are beyond the scope of this manual but the information can easily be found. Below is a chart of several plants that contain NN-DMT, 5-OH-DMT, and 5-MeO-DMT (DMT's close cousin.)
Extraction Procedure
For our experiment we will be using Mimosa hostilis root-bark to provide a very pure product of NN-DMT without the over powering influence of 5-MeO-DMT or the negative side effects of 5-OH-DMT. For a solvent we will be using common naphtha. Notes on adaptations for chemicals and other variations of this process are described as well. The following is a list of materials:
STATEMENT OF HAZARDS: Methylene Chloride
Suspect cancer hazard. Risk of cancer depends on duration and level of contact. Harmful if swallowed. Causes skin and eye irritation. Causes respiratory tract irritation. May affect blood cells. May affect the central nervous system. May cause blindness. Avoid breathing vapor or mist. Handle with caution. Keep in mind these risks whenever substituting DCM for any other solvent.
STATEMENT OF HAZARDS: Muratic Acid
STEP 1
Preparing Plant Material
Acidify Water to pH 2
Convert Alkaloids to Salts
Filtration
Collect 3 Extractions
STEP 6
Defatting
STEP 7
Prepare to Basify
In this step we will be preparing the solution for the alkaloids migration using a common organic non-polar solvent. For our solvent we will use warm naphtha (other solvents are identified in STEP 6.)
Add to Jar B 100 ml (~3 ounces) warm naphtha. Shake the jar for 5 minutes.
STEP 8
Basify to pH 9
STEP 9
Emulsions
STEP 10
Final Alkaloid Extraction and Evaporation
Lab Notes from Previous DMT Extractions
LAB #1
LAB #2
LAB #3
BIBLIOGRAPHY
The Vaults of Erowid: www.erowid.org
Perhaps the best collection of information on the internet about chemicals and plants for anyone new to drugs. Within this document I have reprinted several smaller pictures found from their website. Although I asked permission, I was never sent a response, but here I credit their wonderful database and used the pictures anyway.
Color photo of a large ultrapure DMT crystal, grown in 1996. The crystal is approximately 1 inch across.
Anonymous Photographer. Used by Erowid.
/chemicals/show_image.php?i=dmt/dmt_crystal1.jpg
Color photo of a pile of DMT crystals extracted with Naptha.
Photo by Bucwheat. © 2000 Erowid.
/chemicals/show_image.php?i=dmt/dmt_crystal2.jpg
Color photo of a small vial full of N,N-DMT crystals.
Anonymous Photographer. © 2000 Erowid.
/chemicals/show_image.php?i=dmt/dmt2.jpg
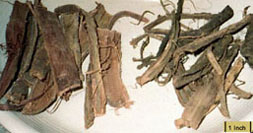
Color photo of a collection of rootbark pieces layed out on a plate.
Photo by Murple. © 2000 Erowid.
/plants/show_image.php?i=mimosa/mimosa_hostilis6.jpg
Psychedelic Shamanism The Cultivation, Preparation and Shamanic Use of Psychotropic Plants.
DeKorne, Jim. (1994)
Publisher : Loompanics Unlimited
ISBN : 1-55950-110-3
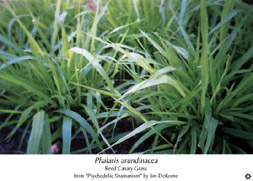
Color photo of grass growing outdoors. (Pictured as found on Erowid.)
/plants/show_image.php?i=phalaris/images/archive/phalaris_arundinacea1.jpg
Rhodium - an informative element: Rhodium
A collection of highly technical information. I humble myself before the knowlege they posess.
rhodium/chemistry/equipment/ph-indicator.html
Ayahuasca Analogues: Pangaen Entheogens.
Ott, Jonathan. (1994).
Kennewick, WA: Natural Products.
ISBN: 0-9614234-5-5
Tryptamines I Have Known And Loved: The Chemistry Continues. (Part 2)
By Alexander and Ann Shulgin.
Journal of Pharmaceutical Sciences.
Vol. 56, page 1526.
Thanks to:
And all those who have helped expand and add to this piece of literature. I am in debt to all those within the beautiful community who have helped create this fine guide. Feel free to add to this your own written observations, dreams, or thoughts on these topics.
NOTE OF WARNING: QT's DMT Extraction for Students is archived by Erowid as a historical document. The process as described has been critiqued as flawed and dangerous several ways. Safer and more effective DMT extraction and purification techniques have been developed and made available in the years since the document below was created. For one such process, see Noman's "DMT for the Masses".
Specific concerns regarding QT's tek, detailed below, were sent to Erowid on behalf of the community at The DMT Nexus, who note: "Time and time again, people have come to The DMT Nexus or other web forums because they were following QT's tek and it either didn't work or they ran into serious issues trying to follow it. Our largest concerns with QT's tek are related to health and safety. Throughout the tek, comments on safely handling chemicals are scant. If we've learned one thing, it's that people doing extractions by following a tek as though it's a recipe often are not sticklers for proper handling and safety. Following the tek as it is written could lead to serious bodily harm, it may not successfully extract DMT, and even if some DMT is obtained, there is a strong possibility of it being contaminated with toxic substances." Erowid is grateful to be able to share the detailed commentary and harm-reduction efforts of The DMT Nexus folks. -- The Erowid Crew, February 4, 2011
Health and Safety Concerns
1) The tek recommends using hydrochloric acid without appropriate guidance on safe handling. While it also mentions other acids, HCl is specifically recommended. However, weaker acids like citric acid or vinegar are preferable alternatives because they can be handled more safely and are readily available at grocery stores.
2) While the tek mentions the health hazards of working with dichloromethane (DCM), it fails to note the flammability hazards of naphtha and ether. It likewise does not mention the intoxication hazards from the fumes, which necessitate minimizing contact and using them in a well-ventilated and spark-free area (and some fans that one might use for ventilation could have the potential of creating sparks).
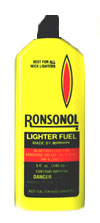
3) The tek describes a method for obtaining ether from starting fluid. This method will generally not obtain pure ether. Unless the extractor has a good working knowledge of chemistry and has consulted the Material Safety Data Sheet (MSDS) for the specific starter fluid, this could easily lead to very unhealthy contaminants in one's end product. The tek specifically mentions Coleman fuel, Zippo lighter fluid, and Ronsonol, all of which have been reported to contain non-volatile contaminants. Particularly since the tek instructs the extractor to obtain the final product by evaporation, this seriously needs to be addressed to prevent people from unwittingly smoking harmful contaminants.
4) No health and safety warnings are provided with regard to chloroform, which may be carcinogenic and can have other negative health effects if not handled properly.
5) Suggesting that people employ ziploc bags as separatory funnels is hazardous in a couple of ways. Such bags are not made from high-density polyethylene (HDPE), a plastic known to have a high resistance to chemical solvents. Ziploc bags contain plasticizers (additives that increase flexibility, and that have been implicated in adverse effects on health when consumed), which would likely leach into naphtha; and since the naphtha is being evaporated, these plasticizers will end up in the extracted DMT. While the tek does suggest making sure that the solvent used doesn't melt the bag, this ignores the likelihood that it may leach harmful contaminants. (The suggestion to use a "turkey baster" may present a similar problem, depending on what type of plastic it is constructed from.) Furthermore, there's a very good chance of spilling caustic chemicals if the ziploc bag fails to work as anticipated.
6) The tek calls for "warm naphtha" on multiple occasions, but makes no mention of how to go about safely warming this flamable solvent. If unwary extractors were to heat it on a gas stove, they could easily find themselves with a fireball in their face!
7) The tek does not present sufficient safety warnings regarding lye (sodium hydroxide). "Take proper precautions" is not specific enough advice. When working with lye, one should wear shatter-resistant anti-fog safety goggles, chemical-resistant (nitrile) safety gloves, a vapor/fluid-resistant face mask, and a polyethylene safety apron, to prevent blindness and chemical burns. One should also have an acid such as vinegar on-hand to neutralize any possible lye spills.
8) The tek recommends obtaining the DMT by evaporating-off the naphtha. Before it was widely known that purification could be performed via freeze-precipitation, this might have been excusable, if not for the fact that many of the tek's recommended varieties of naphtha include non-volatile contaminants, and the tek suggests employing non-HDPE plastics. Considering the processes recommended in the tek, any DMT obtained by evaporation is reasonably likely to be tainted with harmful contaminants and would not be safe to consume. The tek acknowledges that the product will be impure, but provides no information on purifying it. Indeed, it explicitly seems to recommend consuming it, impurities and all. And "Don't worry about weighing it" is bad advice, plain and simple.
Technical Errors
1) Incorrect terminology is used in step 3. One is not converting the DMT to a salt; it's already a salt in the plant material. And, of course, the ions dissociate when salts dissolve. The step might be more appropriately titled "Dissolving DMT Cations in Water", or at least "Dissolving Salts of DMT".
2) Incorrect terminology is used in step 8. One is not unhooking the DMT salts (they're in solution, so they aren't really hooked together at all). One is actually deprotonating the DMT cations to generate the free-base.
3) QT suggests that ammonia is typically used to basify, and that this tek's use of lye is a departure from the norm. However, ammonia is not an effective base for Mimosa tenuiflora [= M. hostilis] root-bark (MHRB). All one will get is a stubborn emulsion.
4) The recommended pH after adding the base is too low; pH 9 is not high enough. With MHRB in particular there are serious emulsion issues at pH 9; but even ignoring that, pH 9 is only 0.32 above the pKa (-log10 acid dissociation constant) of DMT--not terribly efficient.
5) The tek states that it is ideal to extract an alkaloid at its pKa. This not necessarily true. At its pKa, half of the alkaloid is protonated and the other half unprotonated. In ideal conditions (i.e., assuming infinite solubility in the nonpolar extraction solvent), this is sufficient since Le Châtelier's principle is on one's side. But unless there are instability-related complications or other factors to account for, it's better to have the vast majority of the alkaloid in the desired form (in this case, unprotonated)--especially with MHRB, where emulsions are a crucial issue.
6) The tek treats emulsions as though they are inevitable, that one should not be concerned if these take several days to resolve, and that it's near-miraculous for an emulsions to resolve in less than an hour. This is insanity. Emulsions can be prevented by ensuring sufficiently high pH and by mixing gently (rather than shaking, as the tek suggests). The addition of plain salt may be employed as a further preventative measure.
7) The tek suggests that the final product may contain "hydroxide". Hydroxide is not a molecule, it's an ion. It is possible that the product could contain sodium hydroxide or other hydroxide salts, but neither of the recommended methods for eliminating the "hydroxide" would help at all if the product actually were contaminated with sodium hydroxide or another hydroxide salt.
Practical Issues
1) The pH for step 2 is unnecessarily low. While pH 2 won't hurt anything, it's a waste of materials.
2) Ridiculously long times are presented for the aqueous acidic extraction. The tek recommends 24 hours for the first soak, and a whole week for subsequent soaks. In reality, simmering 15-30 minutes three times will get most of the DMT out of the MHRB and into solution. There is no need to spend two weeks; this step can be done in two hours or faster.
3) The tek recommends defatting, even though it is designed for use with MHRB, which is not a fatty material. This is a waste of solvent and time.
4) Step 7 says to add warm naphtha to the acidic MHRB extract and shake it for five minutes before adding lye. This won't accomplish anything.
5) The tek says to repeat steps 7-9 two more times. In step 8, one is told to add 5 grams of lye to the mix. Is the tek really suggesting that this step is also supposed to be repeated, with more lye added each time? Of course, that extra lye isn't going to hurt--on the contrary, it will likely bring the pH up into a more practical range than the tek (seems to) recommend. But why is the tek suggesting that one add more base prior to each extraction with nonpolar solvent, instead of adding all that one is going to use at one time? We suspect that this is just an artifact of poor phrasing on the part of the tek's author.
6) The tek calls for using way too much naphtha for extractions, suggesting 100 ml per pull for 30 grams of MHRB. A tenth of that would be sufficient.
7) In "Lab Notes" under step 6, the tek suggests that one should be saving the naphtha from the defatting process, but discarding the DMT-laden naphtha from the later steps. Why would one want to save the (practically non-existent) fats from MHRB but throw away the DMT?
8) "You will know when DMT is in the final product by the smell." This is an odd statement, since DMT is supposed to be the final product, not merely be contained in it.
9) Outdated info: The tek suggests using Red Devil lye; however, the manufacturer of this brand discontinued production in 2005.
10) The three sets of "Lab Notes" from QT's extraction record that the extractions took 24 days, 39 days, and 61 days. Yikes! A quick and effective acid/base extraction can be completely finished in 24 hours (and that includes time for freeze-precipitations); a big, leisurely (and frankly, unnecessarily long) acid/base extraction (BLAB) is still done in a week. From a legal standpoint, it seems prudent to complete an extraction as quickly as possible so that--if worse comes to worst--the extractor is only on the hook for possession of a controlled substance and not for manufacture as well.
11) The tek is written for MHRB with lye as the base and naphtha as the non-polar solvent; yet it implies that it would be just as effective for Phalaris grasses with chloroform as the solvent. Unfortunately, different factors need to be taken into account for different plants and solvents. Getting clean DMT out of Phalaris grasses, in particular, is a massive chore, requiring its own specialized tek.
Minor Gripes
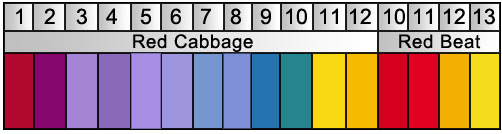
1) Measuring pH with beets and cabbage? Seriously? That's pretty ghetto. Litmus papers and pH monitors are fairly cheap if one cared to measure the pH. And with MHRB, it's not necessary; a dash of acid is fine for the initial extraction, and MHRB provides its own handy color-changing reaction when enough base has been added.
2) Multiple times, the tek refers to "naptha" instead of naphtha.
Specific concerns regarding QT's tek, detailed below, were sent to Erowid on behalf of the community at The DMT Nexus, who note: "Time and time again, people have come to The DMT Nexus or other web forums because they were following QT's tek and it either didn't work or they ran into serious issues trying to follow it. Our largest concerns with QT's tek are related to health and safety. Throughout the tek, comments on safely handling chemicals are scant. If we've learned one thing, it's that people doing extractions by following a tek as though it's a recipe often are not sticklers for proper handling and safety. Following the tek as it is written could lead to serious bodily harm, it may not successfully extract DMT, and even if some DMT is obtained, there is a strong possibility of it being contaminated with toxic substances." Erowid is grateful to be able to share the detailed commentary and harm-reduction efforts of The DMT Nexus folks. -- The Erowid Crew, February 4, 2011
Health and Safety Concerns
1) The tek recommends using hydrochloric acid without appropriate guidance on safe handling. While it also mentions other acids, HCl is specifically recommended. However, weaker acids like citric acid or vinegar are preferable alternatives because they can be handled more safely and are readily available at grocery stores.
2) While the tek mentions the health hazards of working with dichloromethane (DCM), it fails to note the flammability hazards of naphtha and ether. It likewise does not mention the intoxication hazards from the fumes, which necessitate minimizing contact and using them in a well-ventilated and spark-free area (and some fans that one might use for ventilation could have the potential of creating sparks).
3) The tek describes a method for obtaining ether from starting fluid. This method will generally not obtain pure ether. Unless the extractor has a good working knowledge of chemistry and has consulted the Material Safety Data Sheet (MSDS) for the specific starter fluid, this could easily lead to very unhealthy contaminants in one's end product. The tek specifically mentions Coleman fuel, Zippo lighter fluid, and Ronsonol, all of which have been reported to contain non-volatile contaminants. Particularly since the tek instructs the extractor to obtain the final product by evaporation, this seriously needs to be addressed to prevent people from unwittingly smoking harmful contaminants.
4) No health and safety warnings are provided with regard to chloroform, which may be carcinogenic and can have other negative health effects if not handled properly.
5) Suggesting that people employ ziploc bags as separatory funnels is hazardous in a couple of ways. Such bags are not made from high-density polyethylene (HDPE), a plastic known to have a high resistance to chemical solvents. Ziploc bags contain plasticizers (additives that increase flexibility, and that have been implicated in adverse effects on health when consumed), which would likely leach into naphtha; and since the naphtha is being evaporated, these plasticizers will end up in the extracted DMT. While the tek does suggest making sure that the solvent used doesn't melt the bag, this ignores the likelihood that it may leach harmful contaminants. (The suggestion to use a "turkey baster" may present a similar problem, depending on what type of plastic it is constructed from.) Furthermore, there's a very good chance of spilling caustic chemicals if the ziploc bag fails to work as anticipated.
6) The tek calls for "warm naphtha" on multiple occasions, but makes no mention of how to go about safely warming this flamable solvent. If unwary extractors were to heat it on a gas stove, they could easily find themselves with a fireball in their face!
7) The tek does not present sufficient safety warnings regarding lye (sodium hydroxide). "Take proper precautions" is not specific enough advice. When working with lye, one should wear shatter-resistant anti-fog safety goggles, chemical-resistant (nitrile) safety gloves, a vapor/fluid-resistant face mask, and a polyethylene safety apron, to prevent blindness and chemical burns. One should also have an acid such as vinegar on-hand to neutralize any possible lye spills.
8) The tek recommends obtaining the DMT by evaporating-off the naphtha. Before it was widely known that purification could be performed via freeze-precipitation, this might have been excusable, if not for the fact that many of the tek's recommended varieties of naphtha include non-volatile contaminants, and the tek suggests employing non-HDPE plastics. Considering the processes recommended in the tek, any DMT obtained by evaporation is reasonably likely to be tainted with harmful contaminants and would not be safe to consume. The tek acknowledges that the product will be impure, but provides no information on purifying it. Indeed, it explicitly seems to recommend consuming it, impurities and all. And "Don't worry about weighing it" is bad advice, plain and simple.
Technical Errors
1) Incorrect terminology is used in step 3. One is not converting the DMT to a salt; it's already a salt in the plant material. And, of course, the ions dissociate when salts dissolve. The step might be more appropriately titled "Dissolving DMT Cations in Water", or at least "Dissolving Salts of DMT".
2) Incorrect terminology is used in step 8. One is not unhooking the DMT salts (they're in solution, so they aren't really hooked together at all). One is actually deprotonating the DMT cations to generate the free-base.
3) QT suggests that ammonia is typically used to basify, and that this tek's use of lye is a departure from the norm. However, ammonia is not an effective base for Mimosa tenuiflora [= M. hostilis] root-bark (MHRB). All one will get is a stubborn emulsion.
4) The recommended pH after adding the base is too low; pH 9 is not high enough. With MHRB in particular there are serious emulsion issues at pH 9; but even ignoring that, pH 9 is only 0.32 above the pKa (-log10 acid dissociation constant) of DMT--not terribly efficient.
5) The tek states that it is ideal to extract an alkaloid at its pKa. This not necessarily true. At its pKa, half of the alkaloid is protonated and the other half unprotonated. In ideal conditions (i.e., assuming infinite solubility in the nonpolar extraction solvent), this is sufficient since Le Châtelier's principle is on one's side. But unless there are instability-related complications or other factors to account for, it's better to have the vast majority of the alkaloid in the desired form (in this case, unprotonated)--especially with MHRB, where emulsions are a crucial issue.
6) The tek treats emulsions as though they are inevitable, that one should not be concerned if these take several days to resolve, and that it's near-miraculous for an emulsions to resolve in less than an hour. This is insanity. Emulsions can be prevented by ensuring sufficiently high pH and by mixing gently (rather than shaking, as the tek suggests). The addition of plain salt may be employed as a further preventative measure.
7) The tek suggests that the final product may contain "hydroxide". Hydroxide is not a molecule, it's an ion. It is possible that the product could contain sodium hydroxide or other hydroxide salts, but neither of the recommended methods for eliminating the "hydroxide" would help at all if the product actually were contaminated with sodium hydroxide or another hydroxide salt.
Practical Issues
1) The pH for step 2 is unnecessarily low. While pH 2 won't hurt anything, it's a waste of materials.
2) Ridiculously long times are presented for the aqueous acidic extraction. The tek recommends 24 hours for the first soak, and a whole week for subsequent soaks. In reality, simmering 15-30 minutes three times will get most of the DMT out of the MHRB and into solution. There is no need to spend two weeks; this step can be done in two hours or faster.
3) The tek recommends defatting, even though it is designed for use with MHRB, which is not a fatty material. This is a waste of solvent and time.
4) Step 7 says to add warm naphtha to the acidic MHRB extract and shake it for five minutes before adding lye. This won't accomplish anything.
5) The tek says to repeat steps 7-9 two more times. In step 8, one is told to add 5 grams of lye to the mix. Is the tek really suggesting that this step is also supposed to be repeated, with more lye added each time? Of course, that extra lye isn't going to hurt--on the contrary, it will likely bring the pH up into a more practical range than the tek (seems to) recommend. But why is the tek suggesting that one add more base prior to each extraction with nonpolar solvent, instead of adding all that one is going to use at one time? We suspect that this is just an artifact of poor phrasing on the part of the tek's author.
6) The tek calls for using way too much naphtha for extractions, suggesting 100 ml per pull for 30 grams of MHRB. A tenth of that would be sufficient.
7) In "Lab Notes" under step 6, the tek suggests that one should be saving the naphtha from the defatting process, but discarding the DMT-laden naphtha from the later steps. Why would one want to save the (practically non-existent) fats from MHRB but throw away the DMT?
8) "You will know when DMT is in the final product by the smell." This is an odd statement, since DMT is supposed to be the final product, not merely be contained in it.
9) Outdated info: The tek suggests using Red Devil lye; however, the manufacturer of this brand discontinued production in 2005.
10) The three sets of "Lab Notes" from QT's extraction record that the extractions took 24 days, 39 days, and 61 days. Yikes! A quick and effective acid/base extraction can be completely finished in 24 hours (and that includes time for freeze-precipitations); a big, leisurely (and frankly, unnecessarily long) acid/base extraction (BLAB) is still done in a week. From a legal standpoint, it seems prudent to complete an extraction as quickly as possible so that--if worse comes to worst--the extractor is only on the hook for possession of a controlled substance and not for manufacture as well.
11) The tek is written for MHRB with lye as the base and naphtha as the non-polar solvent; yet it implies that it would be just as effective for Phalaris grasses with chloroform as the solvent. Unfortunately, different factors need to be taken into account for different plants and solvents. Getting clean DMT out of Phalaris grasses, in particular, is a massive chore, requiring its own specialized tek.
Minor Gripes
1) Measuring pH with beets and cabbage? Seriously? That's pretty ghetto. Litmus papers and pH monitors are fairly cheap if one cared to measure the pH. And with MHRB, it's not necessary; a dash of acid is fine for the initial extraction, and MHRB provides its own handy color-changing reaction when enough base has been added.
2) Multiple times, the tek refers to "naptha" instead of naphtha.
| Name: | N,N-Dimethyltryptamine |
| Chemical Name: | N,N-Dimethyl-1H-indole-3-ethanamine |
| Alternative Chemical Names: | 3-[2-(dimethylamino)ethyle]indole, DMT |
| Chemical Formula: | C12H 16N2 |
| Molecular Weight: | 188.27 |
| Melting Point: | 44.6-44.8° (crystals) |
| Boiling Point: | 60-80° (crystals) |
| Dosages: | 60-100 mg (smoking) |
| 350 mg (orally) | |
In modern times there has been a reduction of ritual. The ceremonies, that previously served to cast out an individual from modern associations and throw him into a field of epiphanies, have become merely form, betraying the inner forces that must somehow manifest. Shamen know of these inner forces. They understand the inevitable overwhelming psychological experience that everyone will face if they are to complete their inward path to open the unconscious and fall in. The psychological crisis is the fulcrum of any metaphysical realization the individual may have about himself or his world. Without these intense experiences, without the rituals that convey the message of the journey, and without shamen to show the way, many are lost in the world searching constantly farther for what is contained only within. To chemically force such spiritual breakthrough may be interpreted by some as a way to circumvent the trials that are necessary to test each soul willing to see the truth of their life. But in contemporary society where is the individual to seek these tests of the self or to be struck silent in awe of their own natural beauty or that of the universe? The shamen offered these opportunities to the individuals of their society for generations, helping people maintain a healthy psychology between the known world and the mystical. I now offer this ability to you in one of many forms, DMT.
DMT is perhaps the most powerful hallucinogen known to man. It is related to LSD and psilocybin. There are no [commonly used - Erowid] drug tests that would show DMT usage. None of the basic NIDA-5 drug tests [Erowid Note: Now called the "SAMHSA-5"] or any extended drug test will show a result for DMT. DMT is naturally formed in the body and has been found in abnormal levels in the body fluids of persons suffering from schizophrenia. DMT is almost never sold through dealers, rarely synthesized, and seldom used. It is, however, easily extracted from common plant materials and has been used in various forms for hundreds of years (timeline). DMT is not a "social drug" however. Respect the drug and its incredible potential. This drug is not for the inexperienced, nor is it recommended to those who are just looking for another "high." Few seek the visions enabled through DMT, and even fewer return to them. Even avid psychedelic users have had frightening experiences with DMT on their first encounter with the drug. Take care to research and find out if DMT is for you. I stress that educating yourself about this drug (and about all drugs you intend to use) will make you a more competent and prepared chemist, tripper, and guide.
This manual is presented as a quick bench guide for the complete novice on how to extract DMT. Although the text and illustrations for the process were all created by myself, there are a few pictures which are not my own. The origins of these pictures are credited in the bibliography. I would like to encourage others to add to this manual their own written observations. When attempting to produce any of these products the reader is encouraged to read through the steps several times to closely familiarize himself with the entire process. Please take note that DMT is an illegal substance in the United States of America and is controlled under federal regulations. The following is for educational purposes only.
How to Extract DMT from Natural Sources
(in Ten Easy Steps)
First a plant must be selected that contains the chemicals we wish to extract. None of these plants are illegal and they can be found growing wild and free all over the world (much less can be said for some of our other favorite plants.) Most of these plant materials can be ordered through the internet. A little research may reveal a large quantity of some useful plant material growing near you. Alkaloid contents of each plant mary vary according to the growing conditions. Specifics about these plants and how to grow them are beyond the scope of this manual but the information can easily be found. Below is a chart of several plants that contain NN-DMT, 5-OH-DMT, and 5-MeO-DMT (DMT's close cousin.)
| Acacia bark | ||||
| 0.71% | NN-DMT | |||
| Acacia maidenii bark | ||||
| 0.36% | NN-DMT | |||
| Acacia simplicifolia bark | ||||
| 0.86% | NN-DMT | |||
| Mimosa hostilis root (bark) | ||||
| 0.57% | NN-DMT | |||
| Virola shoots & flowers | ||||
| 0.44% | NN-DMT | |||
| Desmanthus illinoensis root (bark) | ||||
| 0.34% | NN-DMT | |||
| Pilocarpus organensis | ||||
| 1.06% | 5-MeO-DMT | |||
| Phalaris tuberosa | ||||
| 0.10% | NN-DMT | |||
| 0.022% | 5-MeO-DMT | |||
| 0.005% | 5-OH-DMT | |||
| Phalaris arundinacea ('net gossip) | ||||
| 0.060% | NN-DMT | |||
| ?? | 5-MeO-DMT | |||
| Psychotria species (averaged, from Jonathan Ott) | ||||
| 0.200% | NN-DMT |
| N,N-DMT | DMT (N,N-dimethyltryptamine) is one of the most hallucinogenic compounds known. DMT is not active orally (unless in the form of an ayahuasca brew), but must be smoked in it's freebase form to experience its effects. (DMT can be taken orally when mixed with a MAOIs, but this is not recommended for the first time user.) The body quickly builds a tolerance for the drug. Your DMT dose must be taken within 60 seconds. Any more of the drug after this first minute will not enhance the experience. It is recommended to give at least one hour before attempting another DMT trip. | |
| 5-MeO-DMT | Effects of 5-MeO-DMT are psychedelic without the visual distortions found in NN-DMT. 5-MeO-DMT is taken at 1/4 the dose of NN-DMT and will overpower the NN-DMT. | |
| 5-OH-DMT | (Bufotenine) can cause severe physical discomfort including circulatory distress, nausea, psychological distress (panic and fear), severe skin flushing, and has the possibility of being fatal. | |
| MAOI | (Monoamine Oxidase Inhibitors) will intensify and prolong the effects of NN-DMT, however this is never recommended. Foolish combinations of MAOIs and other drugs can lead to serious health problems and even death. The tryptamines are normally metabolized by an MAO in the body. MAO metabolizes serotonin, norepinephrine, and dopamine. By inhibiting this, MAOIs increase levels of those neurotransmitters. Tyramine will not be metabolized and will cause an increase in tyramine levels in the blood. |
Extraction Procedure
For our experiment we will be using Mimosa hostilis root-bark to provide a very pure product of NN-DMT without the over powering influence of 5-MeO-DMT or the negative side effects of 5-OH-DMT. For a solvent we will be using common naphtha. Notes on adaptations for chemicals and other variations of this process are described as well. The following is a list of materials:
| 1. Mimosa hostilis root-bark | (30g suggested starting amount - $45/100g) | |
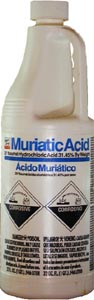
| 2. Muratic acid | (pool acid - $4/gallon) | |
| 3. pH papers | (litmus papers - $3/100 tests) | |
| 4. Lye | (Red Devil Brand - $5) | |
| 5. Naphtha | (Zippo lighter fluid - $5) | |
| 6. Coffee filters and cotton swabs/cloth | ( - $2) | |
| 7. Funnel | ( - $2) | |
| 8. 3 labeled glass jars with lids (thick canning jars work best, but pickle jars will do) | (labeled Jar A , Jar B, and Jar C - $3) | |
| 9. Evaporating dish | (glass baking pan - $10) | |
| 10. Glass pipette | (turkey baster - $4) | |
| 11. Goggles and gloves | ( - $10) | |
| 12. Distilled water | ( - $2) | |
| Total = ~$100.00 |
STATEMENT OF HAZARDS: Methylene Chloride
Suspect cancer hazard. Risk of cancer depends on duration and level of contact. Harmful if swallowed. Causes skin and eye irritation. Causes respiratory tract irritation. May affect blood cells. May affect the central nervous system. May cause blindness. Avoid breathing vapor or mist. Handle with caution. Keep in mind these risks whenever substituting DCM for any other solvent.
STATEMENT OF HAZARDS: Muratic Acid
STEP 1
Preparing Plant Material
|
Acidify Water to pH 2
|
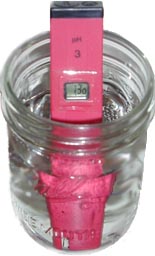
electronic pH meter in jar 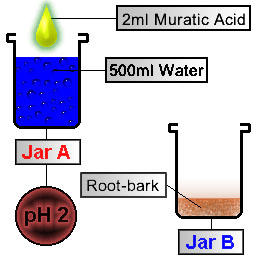
Figure 1 |
Convert Alkaloids to Salts
|
Using a pipette (or turkey baster) transfer enough acidified water from Jar A into Jar B to cover the root-bark in the bottom of Jar B (~8 ounces, or 250 ml acidified water into Jar B.) When the acid reacts with the root-bark, it converts the alkaloids (elf-spice) into salts. To help facilitate this process we can:
|
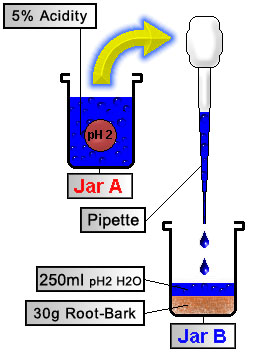
Figure 2 |
Filtration
|
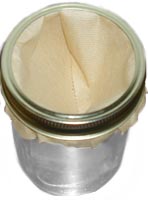
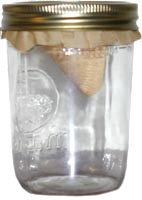
Plug the bottom of the funnel with cotton balls or cotton cloth to create a cotton-filter. Pour the contents of Jar B through the funnel and into Jar C. Squeeze the root-bark contents inside the filter to press out the remaining juices. Save the root-bark that has been caught by the filter and place it back into Jar B.
|
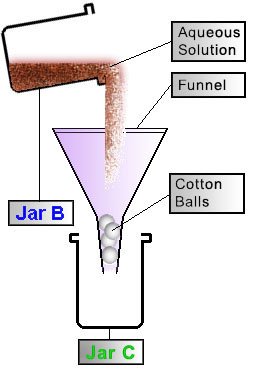
Figure 3 |

Collect 3 Extractions
|
Repeat the process outlined in STEPS 2, 3, and 4, two more times. The initial extraction is most important. For best results, allow the contents of the jar more time to react during the remaining two extractions. Shake Jar B, 4 times a day, for 1 week before filtering each time through a cotton-filter. Collect the acidic contents in Jar C each time. After these initial 3 cotton-filtration cycles, clean Jar A and Jar B, and dispose of remaining root-bark. After all 3 extraction phases, filter the contents of Jar C again, this time using a paper coffee-filter instead of a cotton filter.
Repeat this process as necessary to remove as many of the particulates from our solution as possible.
|
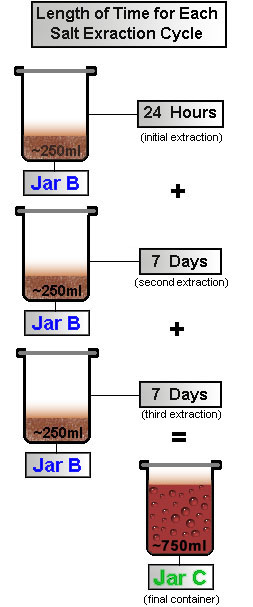
Figure 4 |
Defatting
|
Next we defat the solution. This is part of standard lab procedure whenever extracting alkaloids of this sort. This process removes the oils, fats, and other unwanted substances from our aqueous solution and also helps with yields. All DMT salts are insoluble in non-polar solvents -- with the exception of DMT acetate -- which is soluble in chlorinated non-polar solvents such as chloroform and DCM. Thus if you are using white vinegar (acetic acid) as your acid, you will need to use naptha or ether to defat as chloroform or DCM would extract the DMT acetate along with the oils and fats, defeating the purpose of this step.When using mimosa hostilis root-bark you may find this step unnecessary, however, any plant material foliage containing chlorophyl it is strongly recommended. To do this we add an organic (non-polar) solvent to the acidic solution. Before using any solvents test a significant amount (~500 ml) of the solvent by evaporating it in a dish. This will verify that there are no residues or orders left when evaporation is complete (commonly found in many over-the-counter solvents.) Later in the procedure (STEP 10) you will be evaporating this solvent to leave a smokable form of DMT. Anything your solvent contributes, you may be smoking in the final product. Below are listed several more common organic non-polar solvents.
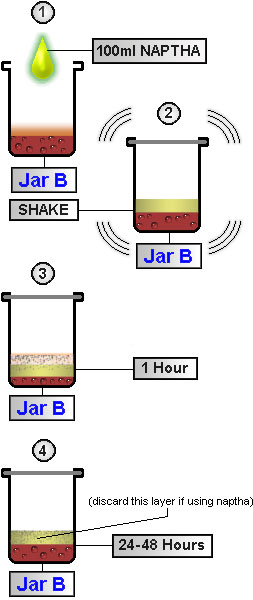
It is important to remember what type of organic solvent you use. For our defatting process we will use naphtha. Add to Jar B ~50-100 ml (~2-3.5 ounces) naphtha. (Only 10-15% the volume of our acidic solution is enough naphtha for this step. Visualize what 10% of the total of the solution is and add that amount of naphtha into the jar.) Cap the lid on Jar B and shake the contents vigorously for 20 minutes. Set Jar B aside and allow for emulsion (foam, bubbles, solutions, particles, etc.) to separate into two distinct layers (much like oil and water will separate.) This may take ~24 hours (48 in some cases.) The oils and fats will migrate into the non-polar solvent layer leaving our alkaloids in the aqueous solution. Since we are using naphtha, the solvent layer will rise to the top of Jar B. Using a pipette (or turkey baster) remove the solvent layer and discard. Repeat defatting process 2 times.
|
Naphtha 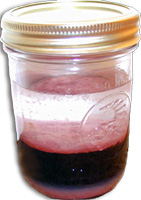
Defatting process 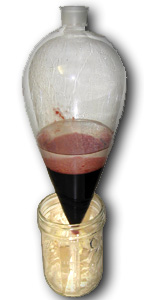
Seperatory Funnel in Jar |

Prepare to Basify
In this step we will be preparing the solution for the alkaloids migration using a common organic non-polar solvent. For our solvent we will use warm naphtha (other solvents are identified in STEP 6.)
Add to Jar B 100 ml (~3 ounces) warm naphtha. Shake the jar for 5 minutes.
STEP 8
Basify to pH 9
|
Now we must basify our solution. By doing this we will "unhook" the salt and transform the alkaloid into its "free base" form. The alkaloids will no longer be a salt, nor will they be soluble in water. This allows us to extract them with the organic solvent added in STEP 7. Ammonium hydroxide is normally used, but for our experiment we will be using NaOH found in household lye crystals (Red Devil drain cleaner) and purchased at hardware stores. Lye is very caustic and can react violently. Take the proper precautions when using lye. A good mixture for basifying is 5g (~0.2 ounces) lye mixed with 95g (~3 ounces) distilled water. The reason we dilute the base is to prevent localized pH spikes which will destroy the alkaloids in the area that we are adding the concentrated base. Create a basic mixture as follows:
Now using a pipette transfer small amounts of solution in Jar A into Jar B.
Approximate Basification Color You have now formed the free base alkaloids that are soluble in non-polar solvents. According to the Merck Index the pKa (natural pH) of DMT is 8.68 (which would make this the ideal pH to extract at.) In many experiments the average pH of the final basified solution in STEP 8 was ~10, which gave satisfactory results everytime. |
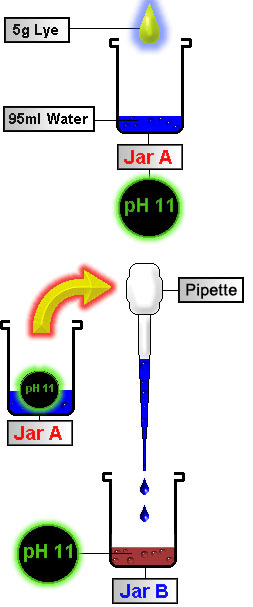
Figure 6 |
Emulsions
|
As these alkaloids dissolve in non-polar solvent added in STEP 7 , an emulsion will form. The strength of emulsion formed is directly proportional to the strength of stirring. Heavy, rapid stirring produces a thick emulsion that takes up to 4 days to settle out. Light, slow stirring over a longer period of time produces and emulsion that separates quickly without affecting the yield. Let the jar sit overnight until the emulsion has separated into two distinct layers. If emulsion has not cleared in 48 hours, try the following:
Using a pipette remove the corresponding solvent layer from Jar B and save it in Jar A. |
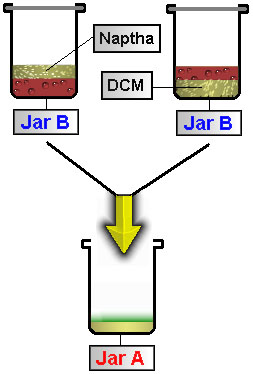
Figure 7 |
Final Alkaloid Extraction and Evaporation
|
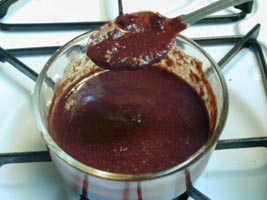
Repeat STEP 7 and STEP 9 (in that order) 2 times. Our elf-spice falls from the basified aqueous solution and into our solvent. The combined solvent fractions from our solvent extractions should now be in Jar A. Pour contents of Jar A into a glass baking dish. Allow for the solvent to evaporate. Evaporation may take up to one week (depending on your solvent.) During this time keep dish with solvent away from heat or open flame. The remaining substance may resemble anything from a sticky orangish goo to white or pale-orange crystals, depending on how well you followed the procedure. Scrape up this substance from the baking pan with a razor. About 25 mg is a good starting amount (try about the size of a pea.) Assuming best yields you could get 5-6 doses (275 mg) from 30g mimosa hostilis root-bark. You will know when DMT is in the final product by the smell. DMT has a distinct synthetic smell, almost like some manufactured plastics.
|


|
Lab Notes from Previous DMT Extractions
LAB #1
| Materials | ||
|---|---|---|
|
||
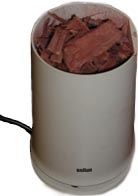
| Day 1: | The root-bark is brittle. To powderize it one had to simply place the sticks of dried bark into the blender. They were immediately ground to a fine powder without any trouble, giving off a pink haze when the cover of the blender was released. The powder was stored in a tupperware container and placed in the back of a freezer. | |
| Day 2: | Muratic acid is powerful. Thick
gloves were worn along with eye protection. Using a stainless steel
teaspoon, about 1-5ml (1 teaspoon) of muratic acid was poured into a pickle
jar that contained roughly 3/4 filtered water (15 ounces or about 500 ml.)
The pickle jar was previously washed twice in a dishwasher in an attempt
to ensure sterility. Under the lid of the pickle jar the manufacturer
had painted on a thin ring of some type of latex or rubber to help seal
the jar. The mixture of water and acid do not seem to affect the
ring (it doesn't dissolve or melt the latex in any way) so the jar and
its lid were used.
The jar was shook to mix the acid and water. Immediately afterwards the pH of the water was tested. The pH was 1 using pH papers to measure. (Compare pH within 30 seconds with litmus.) Added the 25g root-bark to the bottom of jar B. Then the baster was used to pour enough acidified water to just cover the root-bark. Then jar B was capped and shook vigorously for 10 minutes. While shaking the jar it began to foam up with pink foam. Then the jar rest for a couple hours. The contents of the jar broke into 3 layers. The top was pink foam. The middle was a very very dark red (burgundy) color. Light didn't seem to pass through it very well at all. The bottom layer was a lighter red sediment. |
|
| Day 3: | The dark red color of the top layer of liquid has now turned almost black it seems. No light passes through it. | |
| Day 4: | It was decided to heat the solution for several hours in an attempt to speed up the process. The jar and it's contents were propped up on a porcelain stand inside a cooking pot. To this pot was added enough water to surround the pickle jar. The lid to the pickle jar was made finger tight so that the contents could not evaporate but still allow pressure to escape. For roughly 3 hours the mixture sat in very warm water (not boiling.) Occasionally one would lift the jar, and shake the contents before placing it back on the stand. Afterwards the heat source was turned off and the water and the pickle jar contents cooled to room temperature. | |
| Day 5: | A funnel was placed in the empty jar A.
Inside the funnel was placed a cotton T-shirt filter. In jar B the
root-bark and the solution had formed two layers. This made it easier
to sift the smaller particles through the filter before the larger particles
clogged the pores of the filter. After the filter was full of sediment
I took the edges of the filter and twisted to squeeze any remaining liquid
into the second jar. The process was repeated until the jar B was
empty. Then jar C was filled with roughly 2/3 filtered water, and
was added roughly 5ml of muratic acid. The cotton filters were opened
again, and the sediments they held were poured back into the jar B.
Both jars were capped tightly and checked for leaks again. Needless to say anytime one is working with these chemicals one should wear thick gloves and the proper eye and body protection. Acidified water from jar C was siphoned with a turkey baster into jar B until the water covered the sediments. The contents of the jar were again left to sit in warm water, this time about 30 minutes. |
|
| Day 6: | Strained aqueous solution and collected. Added acidic water to remaining plant material. Simmered for 30 minutes. | |
| Day 9: | Final collection of aqueous solution.
Plant material was thrown away. Solution was strained 3 times through
coffee filters.
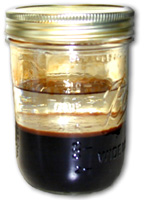
Naphtha (Lighter Fuel) was added. About 100 ml. The jar was shaken vigorously for ~10 minutes, resulting in a thick bubbly solution. This was allowed to rest for 24 hours. After 24 hours the top layer resembles water with a few drops of milk added. There is also a layer of translucent pink scum. This this is the nasty stuff we want to get rid of. To remove the naphtha layer (top layer) it was agreed that it would be best to siphon the bottom layer out of the jar and save it, instead, then clean out the jar containing the remaining nasty naphtha stuff. Using a plastic turkey baster we slowly squeezed the bulb as it passed through the layers into the jar. This forced small bubbles to pour from the nozzle, and prevented any naphtha from entering the baster before we could suck up the bottom layer. After removing the naphtha, the remaining contents were again filtered once through a paper coffee filter. Added 100 ml of naphtha again, and shook the jar for 5 minutes. |
|
| Day 10: | A 5% base solution was made with lye crystals
and water in an empty jar.. About 100 ml water for 1 teaspoon (5ml?)
lye crystals. The jar was shaken, and stirred and made sure all the
lye crystals had dissolved. This was added slowly to the jar containing
our main solution.
After 4 teaspoons of base solution, the mixture changed from a burgundy red to a very grayish blue color. The pH was tested and found to be 7. After 8 teaspoons of base solution the mixture has turned a darker gray color. The pH tested was ~10. After 10 teaspoons of base solution the mixture changed from gray to very inky black. There is a lot of foam. The pH tested was found to be ~11-12. A total of 10 teaspoons were added to this mixture before the pH was ~11. The jar was shaken for several minutes with the cap tightly sealed. Then the jar was placed in a pot of warm water for 15 minutes while slowly stirred. Then the jar was allowed to rest for 3 hours inside the warm water. |
|
| Day 11: | Solution has not separated into two layers. The naphtha layer on top still resembles a thick oily foam. | |
| Day 12: | Solution has not separated into two layers. Markings were made on the side of the jar to see if any progress had been made. Nothing changed in the jar within the last 48 hours. More solvent was added. | |
| Day 13: | No change in solutions. About 1 teaspoon of salt was added to the mixture and stirred gently for 30 minutes. | |
| Day 14: | No change in solutions. The pH was
taken of the aqueous solution. Because of the dark color of the material
being tested it's hard to get an accurate measurement. A small sample
was taken and lightly diluted with water. The pH was about 9 or 10.
Another mixture of lye and water was made in a separate jar. About
2 teaspoons (10 ml) of base solution was added to the mixture in jar B.
The pH was tested again and read about 11 or 12. There seemed to
be an immediate change in the emulsion. A clear layer appeared on
top of the jar, followed by the familiar thick orange bubbles, and then
finally the aqueous solution on the bottom. The container was steeped
in warm water for 1 hour.
After 1 hour the contents were strained 3 times through a cotton-filter and the emulsions were allowed to separate. There was a dramatic improvement after filtration. The top layer of naphtha was removed and saved. Another 100 ml naphtha was added and the jar was heated again for perhaps another hour. The best technique to mixing the two solutions does not seem to be shaking or stirring. Instead, very slowly tip the jar end over end repeatedly for several minutes. This produces an emulsion that settles in about 2-3 hours time. |
|
| Day 15: | The contents of the jar were heated and mixed slowly for a period of 2 hours. Afterwards the top layer was saved and another 100 ml naphtha was added. Again the jar was heated and stirred for a few hours. The solvent layer was removed and placed with the rest of the previous solvent fractions. | |
| Day 16: | The combined solvent fractions were poured into a glass baking dish and set aside for evaporation. | |
| Day 17-20: | 3 day evaporation process. Bottom of dish there appears small yellow/orange crystal formations, circular in pattern, about 2-3mm across. | |
| Day 21: | Some of the outer edges of the crystals have dried a bit. The larger crystals still seem wet. | |
| Day 22: | The entire dish was scraped with a razor. The crystals bunched together and dissolved into a caramel gum like substance. This substance was smeared across a 3X5 note card. | |
| Day 23: | The brownish goo has dried up and reveals a more crystalline structure. This was scrapped off using an exacto knife. | |
| Day 24: | Elf-spice hyperspace. The experiment was a success. | |
LAB #2
| Materials |
|
|
|---|---|---|
| Day 1: | Phalaris grass is very hard to pulverize. The grass was placed in a freezer and then into a blender. To help mash the grass down towards the blades of the blender, a small amount of water was added. Repeatedly the lid to the blender was lifted and the grass had to be pushed back down. It took over an hour to pulverize the grass sufficiently. The mixture of water and clippings was placed into a baggie. The baggie was frozen and thawed several times over a period of 24 hours. | |
| Day 3: | 5ml muratic acid added to a pickle jar that contained roughly 500 ml water. Water and acid were mixed well. 25g of grass was placed in the bottom of jar B and the acidified water covered this amount of grass. Shook the jar and contents. | |
| Day 4-11: | Jar contents are shaken daily. | |
| Day 12: | A funnel was placed in jar A. Inside the funnel was placed a cotton ball. The material from jar B was filtered through the funnel into jar A. The remaining material in the filter was placed back into jar B and covered again with acidified water. Jar B contents are shaken daily for 7 days. | |
| Day 19: | Collection of aqueous solution same as Day 12. | |
| Day 26: | Final collection of aqueous solution.
Plant material was thrown away. Solution was strained 3 times through
coffee filters.
100 ml Naphtha added. The jar was shaken 10 minutes. This was allowed to rest for 24 hours. After 24 hours the nasty stuff was skimmed off the top along with the naphtha solvent. This was done twice. Added 100 ml of naphtha again, and shook the jar for 5 minutes. |
|
| Day 28: | A 5% base solution was made with lye crystals and water in an empty jar. This was added slowly to the jar containing our main solution. The pH was now ~11. The jar was slowly stirred for several hours while heated. | |
| Day 29-31: | After the emulsion had cleared the top layer of naphtha was collected and more naphtha added to the original mixture. This was done 3 times. | |
| Day 39: | The combined solvent fractions were poured into a glass baking dish and set aside for evaporation. After 4 days the dish was scraped clean and the crystals put to use. Success! | |
| Materials | ||
|---|---|---|
| ||
| Day 1: | Ingrediants were cut with scissors and places in coffee grinder for pulverizing. The contents were then placed in pyrex dish with cover. Dish was placed on gas stove and allowed to boil. After boil was achieved the stove was turned off. Periodically the stove was turned on to apply heat to the dish. After 20 minutes the biomass was strained. Placed biomass back into the dish and repeated twice.. | |
| Day 2: | Added Ronsonal lighter fluid about equal to existing volume, covered jar and shook. Result was massive emulsion. Let sit for two months.. A muddly silt formed on the bottom of the jar. I'm guessing it's from not filtering finely enough. | |
| Day 60: | Separated bottom liquid layer using 1 L sep funnel into a clean jar, and discarded top layer. (Thought I'd try de-fatting once. It doesn't seem worth it with MHRB. Probably won't do it in the future.) | |
| Day 61: | I previously prepared a mixture of Red Devil Lye and distilled water. It takes a while to fully dissolve the pellets. Again added about the same amount of naptha as I had liquid, and then added basic solution while stirring to a pH of 11.6. While shaking, I noticed it forming a vacuum, and periodically vented. I'm not sure of the mechanism there. I let it settle, then separated, saving the bottom layer for 2nd and third extractions, and top layer for drying. Drying Tip: get a 4 inch fan, and lay it on top of the pyrex dish, and it will dry overnight | |
BIBLIOGRAPHY
The Vaults of Erowid: www.erowid.org
Perhaps the best collection of information on the internet about chemicals and plants for anyone new to drugs. Within this document I have reprinted several smaller pictures found from their website. Although I asked permission, I was never sent a response, but here I credit their wonderful database and used the pictures anyway.
Color photo of a large ultrapure DMT crystal, grown in 1996. The crystal is approximately 1 inch across.
Anonymous Photographer. Used by Erowid.
/chemicals/show_image.php?i=dmt/dmt_crystal1.jpg
Color photo of a pile of DMT crystals extracted with Naptha.
Photo by Bucwheat. © 2000 Erowid.
/chemicals/show_image.php?i=dmt/dmt_crystal2.jpg
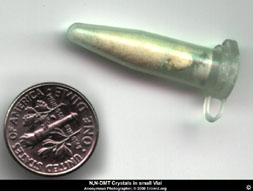
Color photo of a small vial full of N,N-DMT crystals.
Anonymous Photographer. © 2000 Erowid.
/chemicals/show_image.php?i=dmt/dmt2.jpg
Color photo of a collection of rootbark pieces layed out on a plate.
Photo by Murple. © 2000 Erowid.
/plants/show_image.php?i=mimosa/mimosa_hostilis6.jpg
Psychedelic Shamanism The Cultivation, Preparation and Shamanic Use of Psychotropic Plants.
DeKorne, Jim. (1994)
Publisher : Loompanics Unlimited
ISBN : 1-55950-110-3
Color photo of grass growing outdoors. (Pictured as found on Erowid.)
/plants/show_image.php?i=phalaris/images/archive/phalaris_arundinacea1.jpg
Rhodium - an informative element: Rhodium
A collection of highly technical information. I humble myself before the knowlege they posess.
rhodium/chemistry/equipment/ph-indicator.html
Ayahuasca Analogues: Pangaen Entheogens.
Ott, Jonathan. (1994).
Kennewick, WA: Natural Products.
ISBN: 0-9614234-5-5
Tryptamines I Have Known And Loved: The Chemistry Continues. (Part 2)
By Alexander and Ann Shulgin.
Journal of Pharmaceutical Sciences.
Vol. 56, page 1526.
Thanks to:
| Dr. Foss | Gumby | baalchemist |
| Pryor | Placenta_Juan | neuron |
| MagikVenom | GravNet | Malachi |
| Saguaro | Meeker | D-4138 |
| willytell | Mike | NoRezz |
| jane | Gupta | Jack Tripper |
And all those who have helped expand and add to this piece of literature. I am in debt to all those within the beautiful community who have helped create this fine guide. Feel free to add to this your own written observations, dreams, or thoughts on these topics.
Revision History #
- v1.1 - Quantum Tantra
- v1.1.1 - Sep 19 2009 - Erowid - removed confusing text on alkaloid %s table.
- v1.1.2 - Jan 7 2011 - Erowid - Added the term 'aspirator' to the mention of the simple vacuum filter in Step 4 as a clarification after receiving a question.
- v1.1.3 - Feb 4 2011 - Erowid & the community at The DMT Nexus - Added "Note of Warning" including a detailed critique of this tek from the folks at The DMT Nexus.